Secret Store Integration
Overview
Secret Store provides you the flexibility to store the necessary credentials in external storage. By default, credentials are stored in QueryPie storage. However, for centralized management and enhanced security, you have the option to integrate with Secret Store.
Currently, QueryPie supports integration with the following services for credential management:
HashiCorp Vault
AWS Secret Manager (coming soon)
Why Use Secret Store?
Organizations can leverage Secret Store to easily manage and automate credential storage and rotation. Certain organizations prohibit storing credentials externally, except in designated stores. Secret Store integration allows you to comply with these requirements while still using QueryPie securely.
When you store credentials in a Secret Store and use the integration, those credentials are not stored inside QueryPie. To enable authentication, we request the credentials directly from the Secret Store.
Vault integration requires preparation in advance.
Vault server to integrate QueryPie with:
To work with Vault, your Vault server must be up and running. The Vault service must be running, able to process API requests, and able to perform authentication processing on Vault.
Credentials for resources stored in the vault:
To integrate with the vault, you need to save the authentication information of the service (ex. DB, Server, etc.) to access the vault in advance. This means that you have saved the access rights and authentication information (ex. Username, Password, API key, etc.) for the service you want to integrate with in the vault.
The correct path for calling credentials:
The path (path) used to identify credentials stored in the vault must be correct. This is the path that specifies which credentials should be fetched from the vault. This path is associated with the resources and credentials stored in the vault.
For more detailed vault configuration, please refer to the official HashiCorp Vault Documentation.
Set Up Secret Store Integration
Secret Store enables secure management of DB and server authentication information, allowing for secure connections to databases and servers without exposing authentication details directly to users. By storing connection access information, authentication details can be retrieved from the Secret Store for verification instead of storing them within QueryPie.
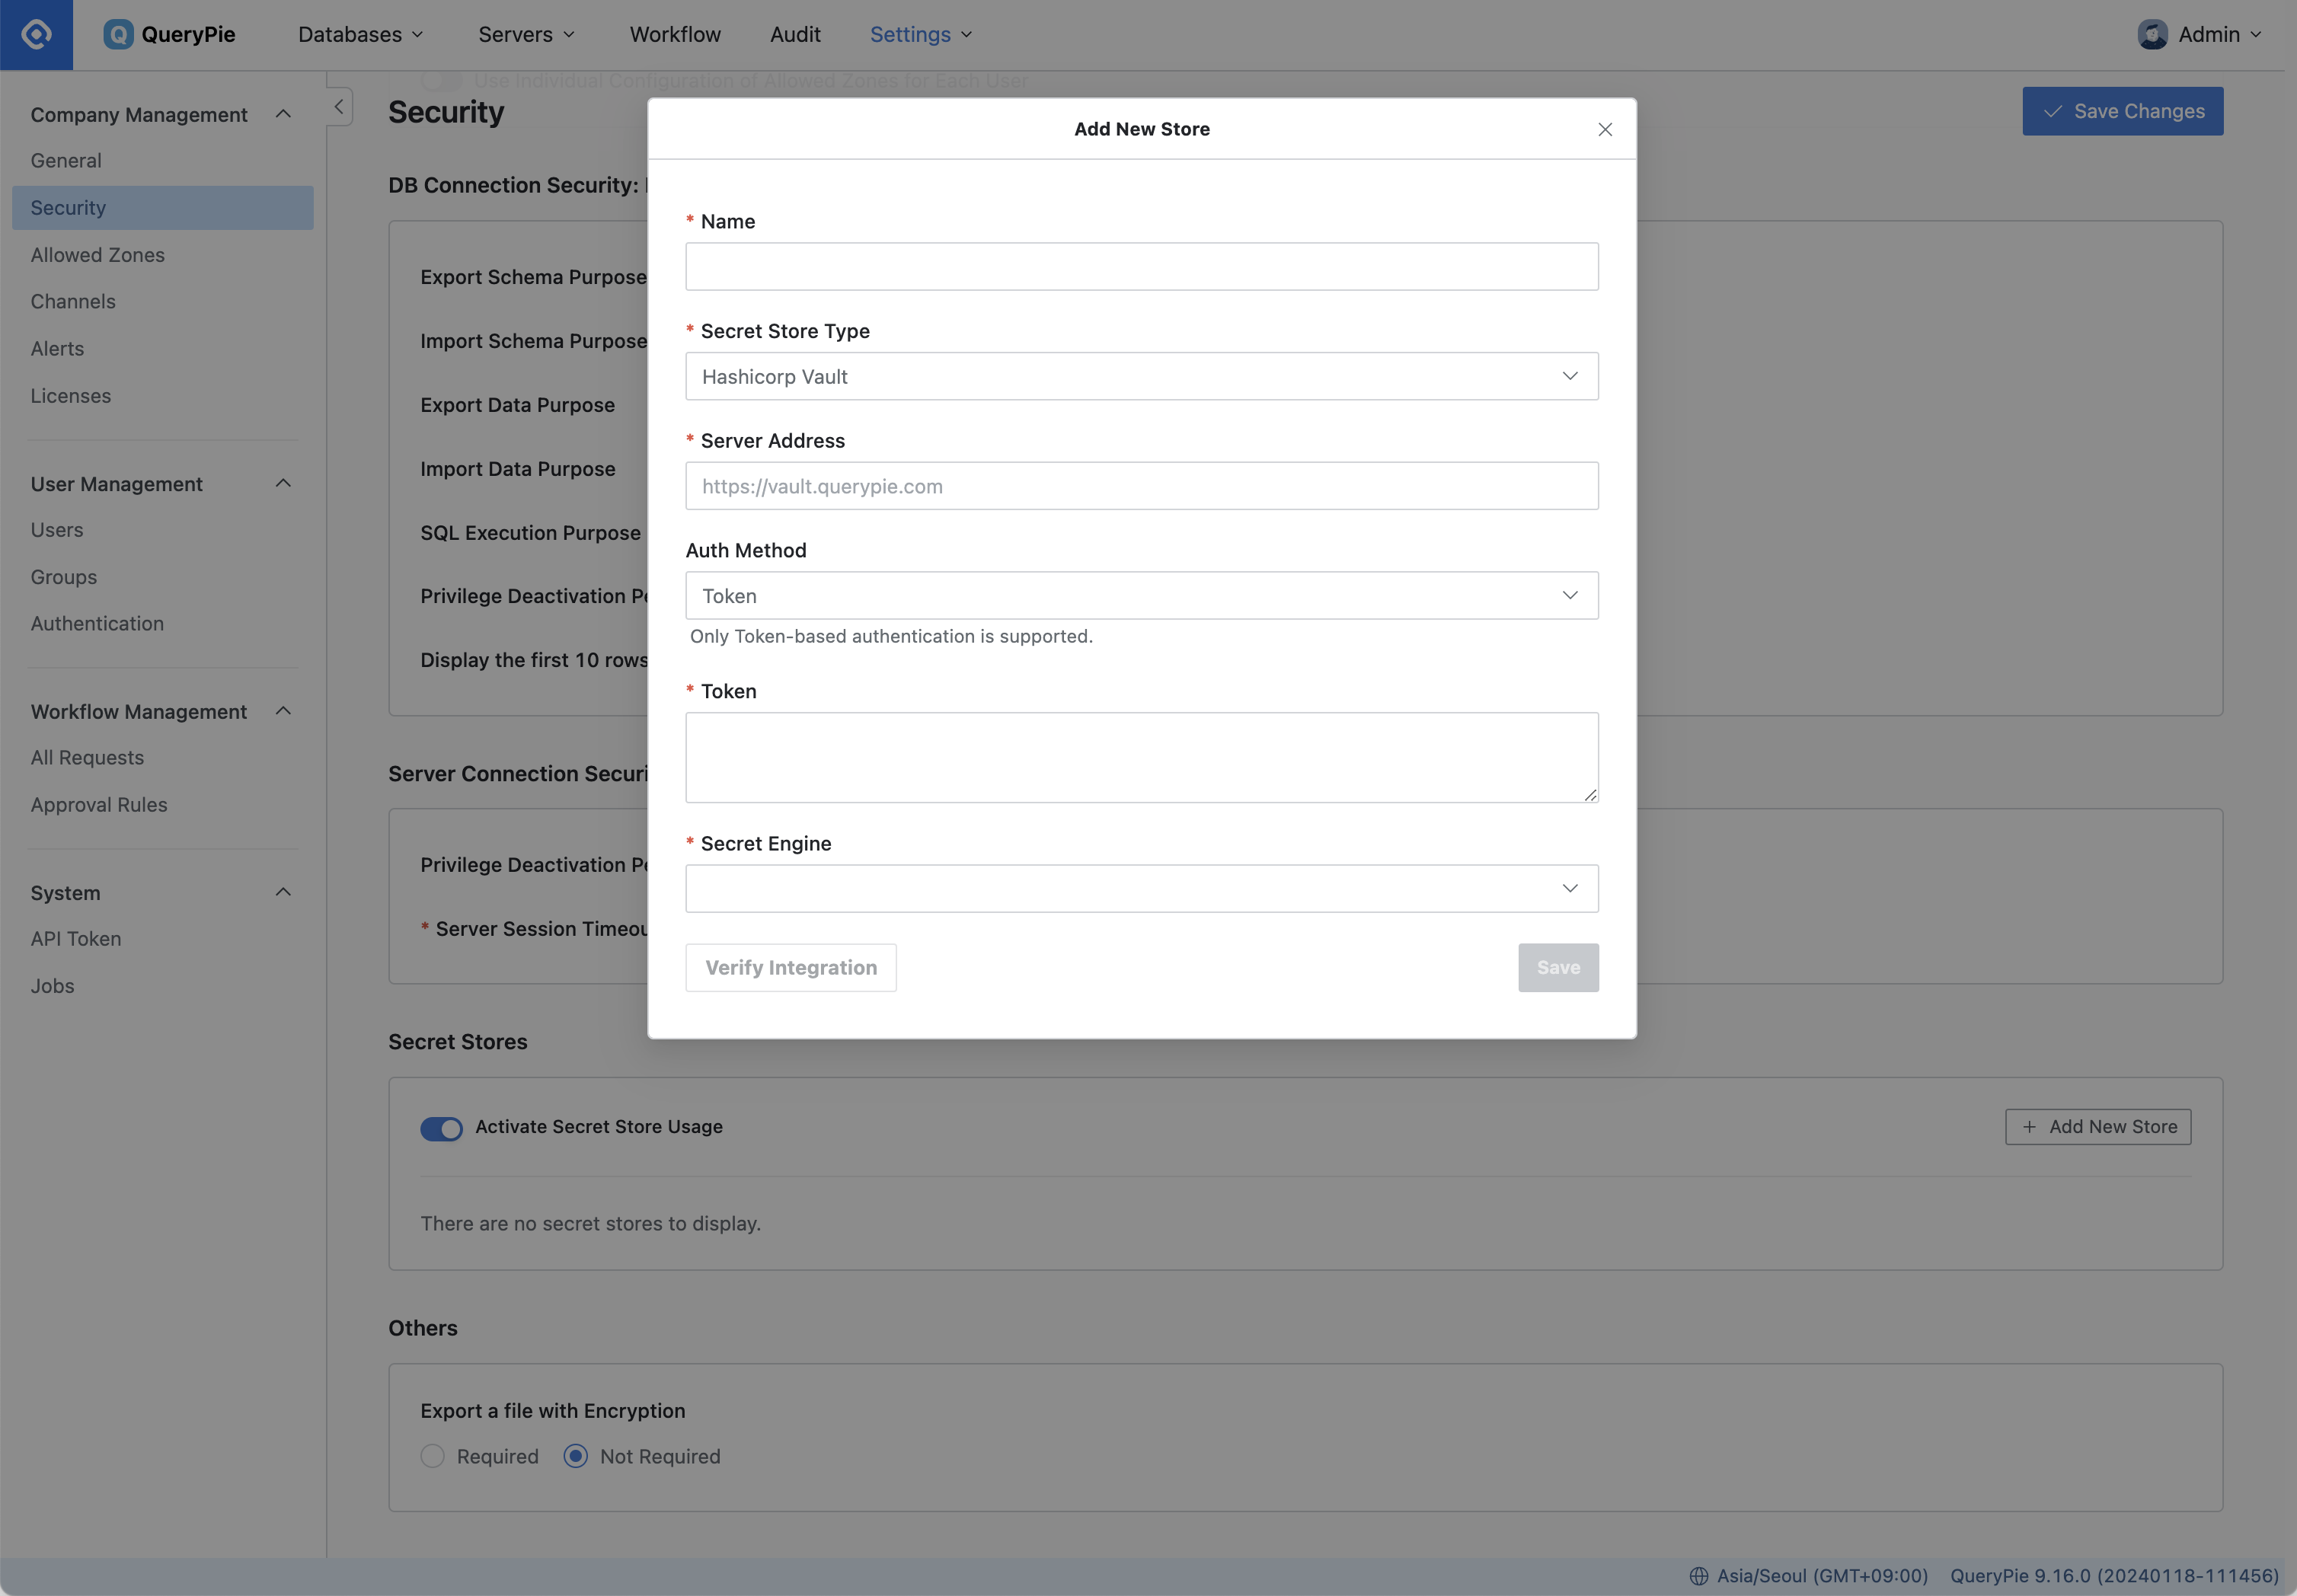
General Settings > Security > Add New Store
Navigate to the Secret Stores settings item in the General Setting > Security menu.
Toggle the
Activate Secret Store Usageoption to enable.Click the
Add New Storebutton.Enter a name for the secret store in the Name field.
In the Secret Store Type field, select the type of store to integrate with.
Provide the authentication information required for integration based on the selected Secret Store type.
Server Address : Enter the address of the Secret Store server.
Auth Method : Select an authentication method for QueryPie and Vault.
Secret Engine : Select the secret engine type for HashiCorp Vault.
It supports two types: Database and K/V engine.
Secret Engine cannot be changed after saving.
To change it, you must deselect Secret Store settings for all connections and reset.
After entering the authentication information required for authentication, click the
Verify Integrationbutton to confirm that the integration is set up properly.Click
Save Changesto save.
On the DB Connection page and on the screen where you enter the server's Account, you will now see a Secret Store selection to choose where to store your authentication information. By default, authentication information is stored inside QueryPie, which can be changed by selecting a different Secret Store type. This setting can be configured differently for each information asset.
Set Up Authentication via Secret Store in DB Connection (based on HashiCorp Vault)
When registering DB connection information, Secret Store integration information is utilized, allowing you to access the connection by linking the pre-designated Secret Store authentication information. By storing DB authentication information in the Secret Store in advance, users can securely connect to DB connections using the stored authentication details, thereby enhancing the security of DB authentication information.

Create a new DB connection by clicking the
Create Connectionbutton in the Database Setting > DB Connection menu.In the Connection information section, locate the Secret Store subsection and select HashiCorp Vault.
Depending on the Secret Engine type stored in the Secret Store settings, the DB Account entry will display differently.
For Secret Engine set to K/V, Username / Password fields will appear on the Connection Information page.
In the Username / Password field, enter the path to the vault in these fields.
The path must follow the format:
prod_db/data/mysql?username.Based on the example, the actual path in the vault is
prod_db > mysqlwhere key isusername.Make sure to include the
/datapath in the middle.
For Secret Engine set to your database, Account field will appear on the Connection Information page.
In the Account field, enter the vault path.
The path must follow the format:
prod_db/creds/mysql_role.
Once you've entered the appropriate vault path, save the connection information by clicking the
Save Changesbutton.
When you select a registered connection from the user's Connection List, you will not see the Username and Password items separately. Instead, when you attempt to connect by clicking the Connect button, the DB connection is established using the authentication information stored in the vault.
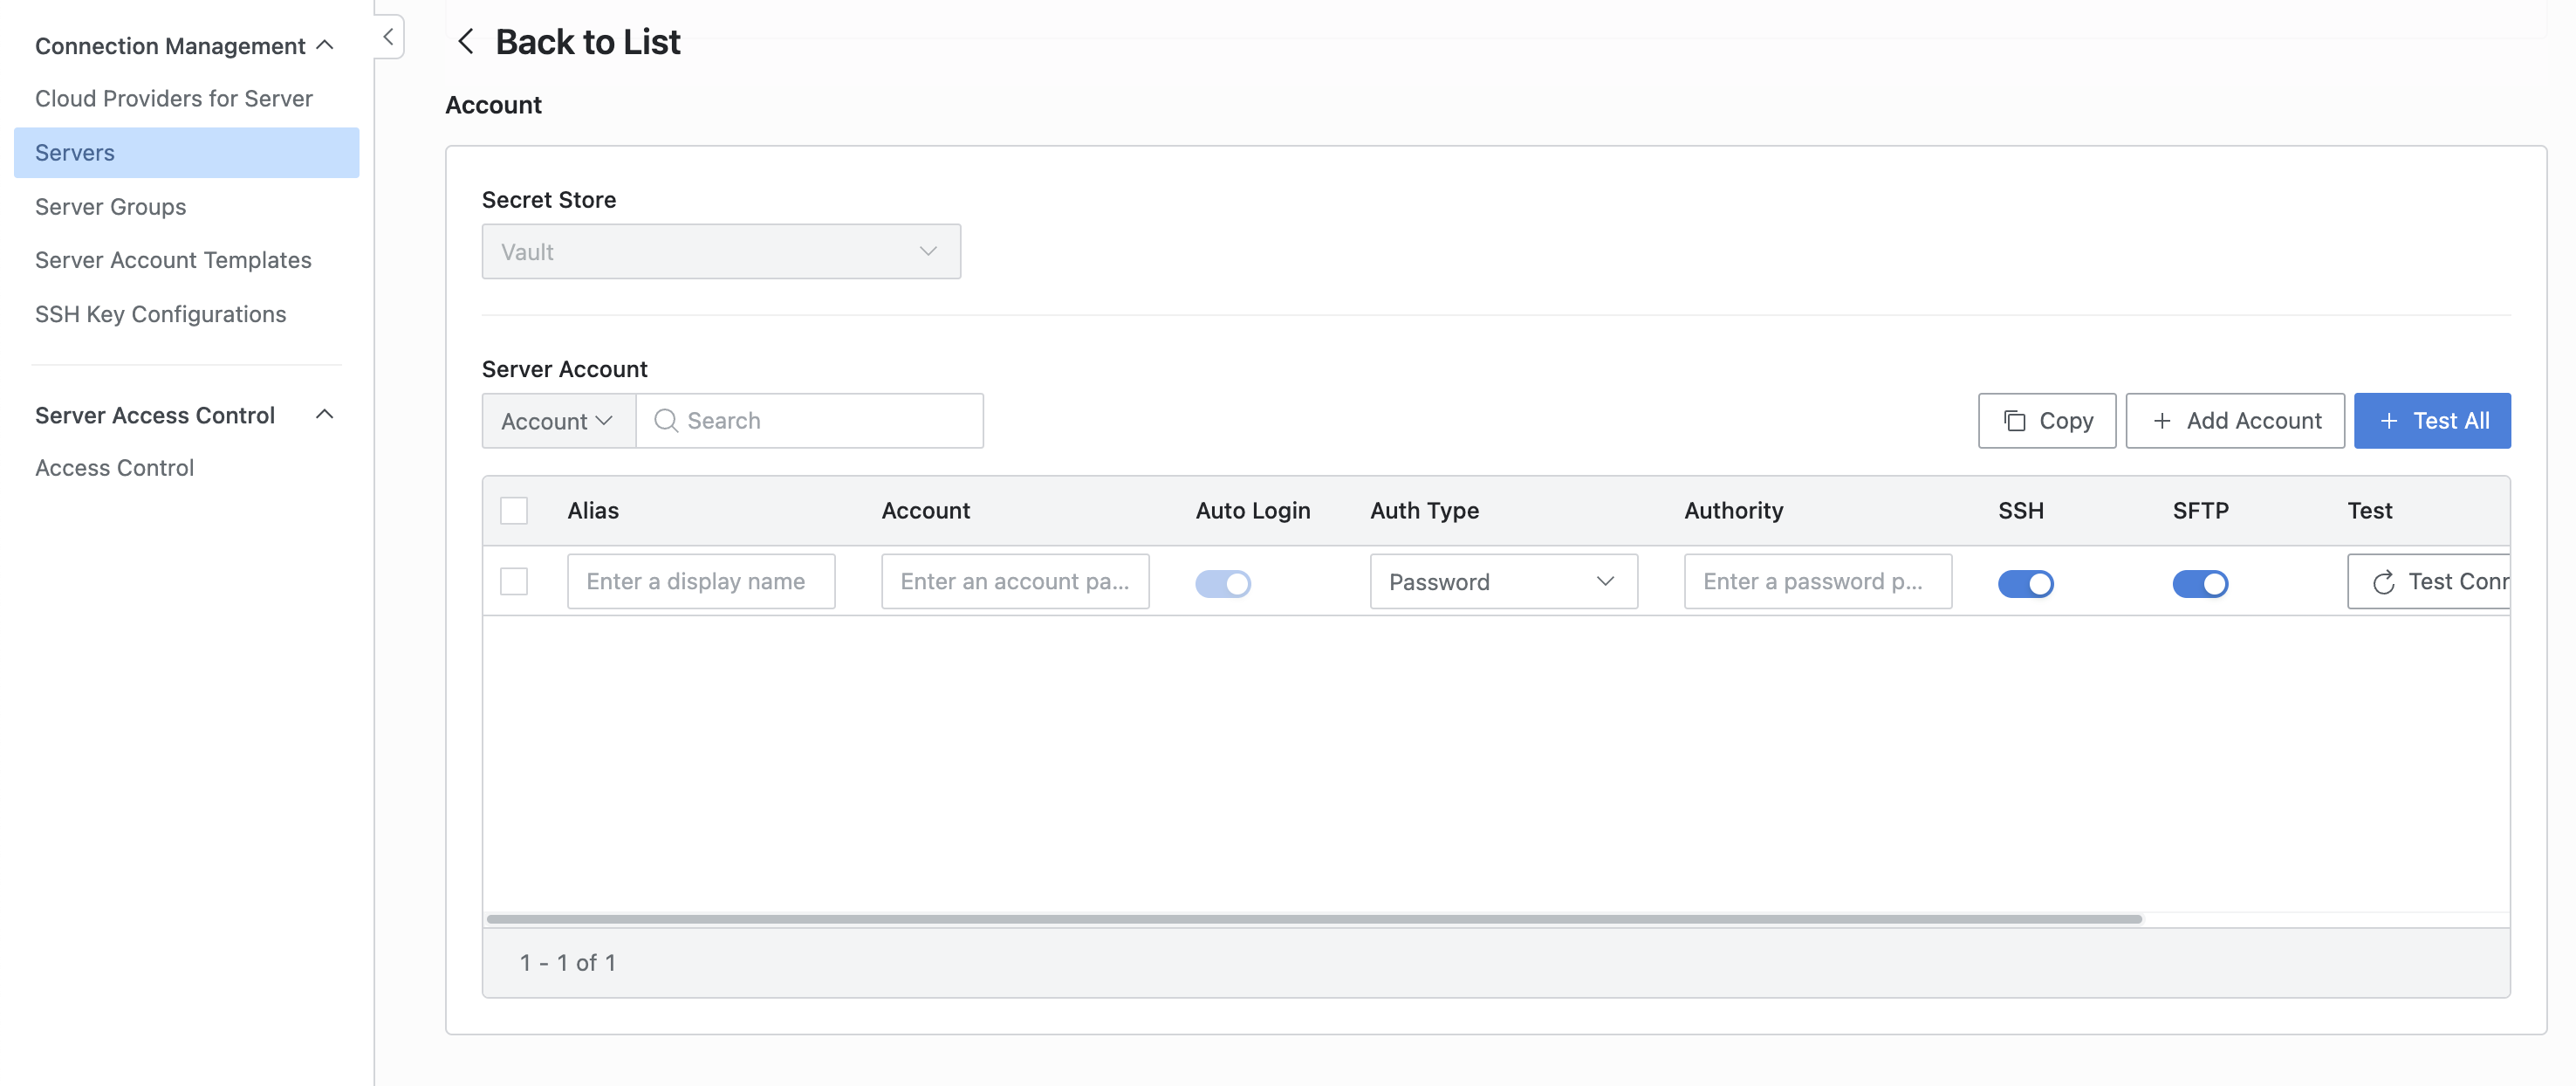
Set Up Authentication With Secret Store on Servers (based on HashiCorp Vault)
You can utilize Secret Store linkage information when registering server account information, and connect to the connection by linking pre-specified Secret Store authentication details. This enhances the security of server credentials by storing them in the Secret Store beforehand and allowing users to connect using the stored server credentials when accessing the server remotely. Servers associated with defined Server Groups are required to use the same Secret Store as those Server Groups.
Create a new server by clicking the
Create Serverbutton in the Server Settings > Servers menu.The settings in the menu below are the same.
Server Settings > Server Groups
Server Settings > Server Account Templates
From the list of Secret Store entries, select a pre-enrolled item.
From the Secret Engine types stored in the Secret Store settings, only K/V entries are supported.
Click the
Add Accountbutton.In the Alias field, enter the server account name that will be visible to users.
In the Account / Authority field, enter the path to the vault.
The path must follow the format:
prod_os/data/linux?account.Based on the example, the actual path in the vault is
prod_os > linuxwhere the key isaccount.Ensure to include the
/datapath in the middle.
Save the server information by clicking the
Savebutton.
Related Topics